In an earlier blog post, we explored a high-level design that uses FME Flow as a no-code backend for an ArcGIS Web AppBuilder (WAB) based web application. Using the architecture described in the first article, this post will focus on the presentation tier (geoprocessing service) and the business logic tier (FME workspace). We leave out the client and data tiers – the former because this is taken care of by Web AppBuilder’s built-in ability to connect to geo-processing services, and the latter because it could be any combination of files, databases, or web services that most readers will have worked with in FME before.
FME Flow Service Types
Within the architecture described there is quite a lot of flexibility around implementation details. One important aspect to decide early on is to do with how FME Flow should be called by the custom geoprocessing service. FME Flow supports two main patterns for how clients can call it, for the purposes of this article they will be referred to as “fire and forget” and “request/response”.
Fire-and-Forget
The Job Submitter service has been a long-time option for sending fire-and-forget requests to FME Flow. When it is called via a GET request it accepts data from the client via URL parameters that map to published parameters in the associated FME workspace. It then uses this data to do its work e.g., update features in a geodatabase or call a web service to update third-party data.
The introduction of a webhook trigger in Enterprise Automations allows for more complex scenarios such as routing calls to different workspaces depending on the data sent by the client, but essentially implements the same fire-and-forget pattern.
The biggest limitation with this approach in the context of a user-facing web application is the inability to return custom data to the client. The only response the client will receive from FME Flow after a successful call is a standard 200/OK or 202/Accepted HTTP status code which tells it that FME has received the call and will try to do the work it was asked to do. This pattern can be a good approach in some scenarios e.g. where the user doesn’t really care about the outcome, or where processing takes so long (minutes or hours) that the user can’t be expected to wait until it finishes. For quickly executed workspaces the fire-and-forget pattern can cause a disconnect between the web client and the backend, which may require additional processes such as email notifications to overcome.
Request Response
The Data Streaming service improves user experience by allowing for two-way data exchange, similar to most daily used web services (e.g. social media, online banking). FME workspaces registered with the Data Streaming service accept inputs either as URL parameters or inside a POST body that is mapped to a reader. Once processing has finished one of the workspace’s text-based writers connects to the web service’s response stream and sends information back to calling application. Using this mechanism, anything from a simple string to a complicated JSON object can be returned to the web client where it can be made available to users in a meaningful way, e.g. by adding an FME Flow-generated array of features to a map, visualising an HTML report etc.
The FME Flow Workspace
For this blog post we’ll use a simple workspace that exposes a published parameter called “NAME”, uses the client-supplied string to generate a message, and then writes this to a text file on disk.
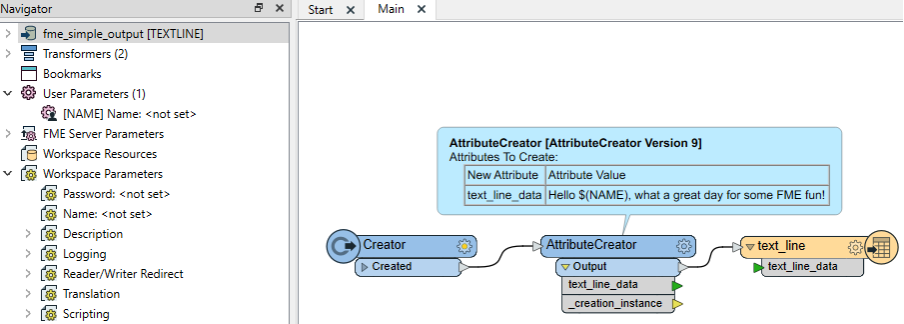
For simplicity’s sake the workspace is published to FME Flow’s Job Submitter service, this means that all we need to do in the custom geoprocessing tool is to check that FME Flow returns Http status code 200. For more complex scenarios that use a POST body and the Data Streaming service, please get in touch with Locus, we would be happy to help.
Geo-processing Toolbox
ArcGIS supports publishing of Geoprocessing tools developed in Desktop as web services. Custom geoprocessing tools can be built via Model Builder, script tools, or Python toolboxes. From a software developer’s point of view Python toolboxes are the best choice. This is because they provide a greater level of flexibility and control over the two other options, and they allow for everything to be done in a single file that can be easily managed in a source control system such as Git.
Within the proposed solution architecture, the main goal with the Python toolbox is to keep the amount of custom code to a minimum. This means that the toolbox itself does not implement any functional requirements; it doesn’t run any ArcGIS tools or pull in any third-party Python modules for analysis or data processing. The only tasks it needs to perform are:
- Parse geoprocessing tool input parameters provided to the web client by a user
- Call FME Flow and pass in the parsed parameters
- Inspect the FME Flow response to work out whether the call was successful
- Display a message in the client that informs users of success or failure of the operation
The code sample below shows a Python toolbox that performs all these tasks. For more information on how to create custom Python toolboxes and geoprocessing services please consult Esri’s documentation.
NOTE: the isLicensed(), updateParameters(), and updateMessages() operations have been removed for brevity’s sake as they aren’t being used with this tool however, they are auto-generated and can be useful in certain scenarios.
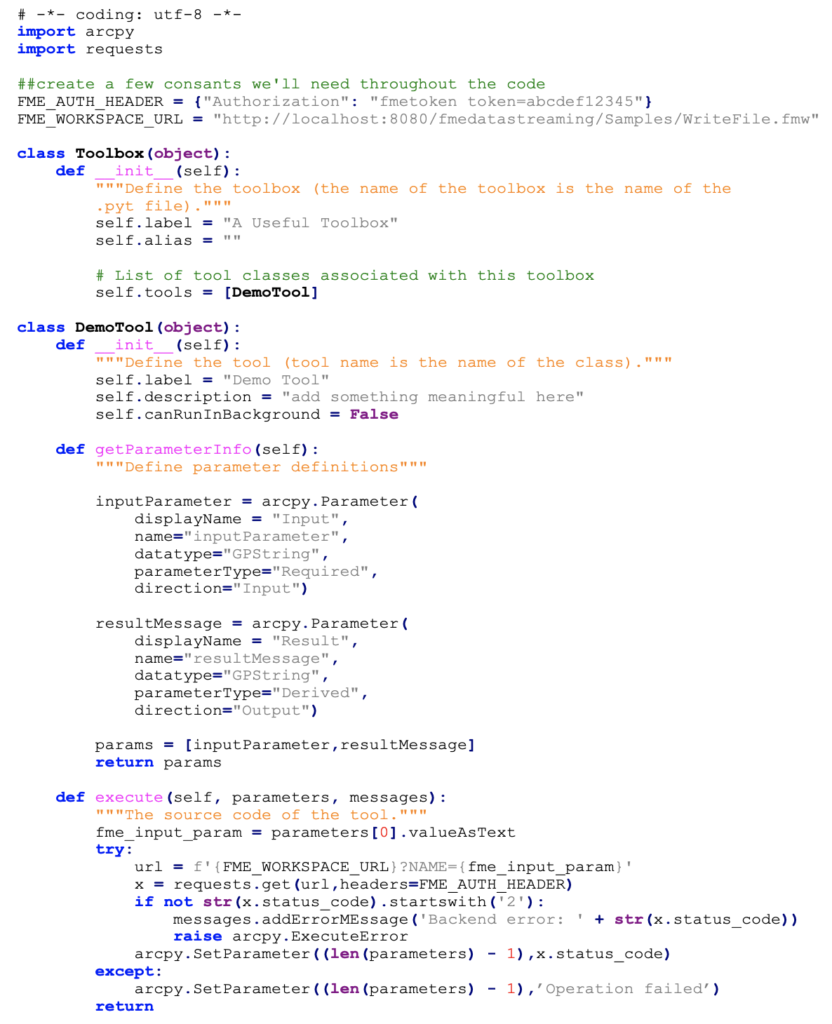
At the top of the script the requests module is imported, this makes it easy to build and execute web requests.
Next two global variables are declared so they can be used anywhere in the code. FME_WORKSPACE_URL is the location of the previously published workspace on FME Flow, FME_AUTH_HEADER defines a standard Http authorization header with an FME Flow token.
NOTE: to minimise the risk of unauthorized access to FME Flow it is recommended to generate an FME Flow token with minimal permissions and encrypt the Python toolbox before publishing it to ArcGIS Server. Alternatively, the script could be modified to retrieve an FME Flow token at runtime from a secure data store such as a SQL Server database that the ArcGIS Server system account has been given access to.
In the Demo Tool’s getParameterInfo method we define an input parameter that corresponds to the FME workspace’s published parameter. More than one user parameter could be mapped, they could have different names, or some FME workspace parameters could be set by the geoprocessing tool in some other way (no user input). Input parameters will be presented to the user via a web form, the output parameter can be displayed on the results tab of the geoprocessing widget once the tool has run.
In the Demo Tool’s execute method the user-specified input parameter is attached to a local variable and then used alongside the FME_WORKSPACE_URL global variable to construct an FME Flow query URL. The request module’s “get” method is used to execute the web service call to FME Flow and the FME_AUTH_HEADER variable is sent along for authentication/authorization.
The FME Flow response is parsed and depending on whether the web service call was successful, the output parameter is either set to the Http success status code or a simple error message.
Conclusion
This blog post discussed the creation of an FME workspace and custom ArcGIS geoprocessing service for providing powerful backend services for a Web AppBuilder application. It covered a basic GET request but more complex requests can also be implemented. For more information or assistance in implementing this approach in your organization please contact Locus.