What is FME?
The only all-data, any-AI platform
TRAINING
Hands-on, practical training for individuals and teams
INTEGRATION
Remove silos, connect all your data and make it usable
FME Flow has a range of different methods to obtain sensor readings from IOT devices. Some of these are:
This demo will show you how to connect this weather station to FME Flow via a webhook and then rebroadcast it via a websocket which you can use to test your own IOT workspaces with real sensor data. The weather station is located at Scott Point, Auckland, New Zealand. https://goo.gl/maps/FrkBp4U3TJx8A7ds7

Station Set Up
This type of weather station, which is available under several brand names, can send data to online weather services such as Weather Underground, but it can also be set up to send data to a custom server, which is how we are going to get it to send readings to FME Flow.
If you have one of these units and want to send data to your FME Flow set it up in WS View like this, choosing to use the Ecowitt protocol:
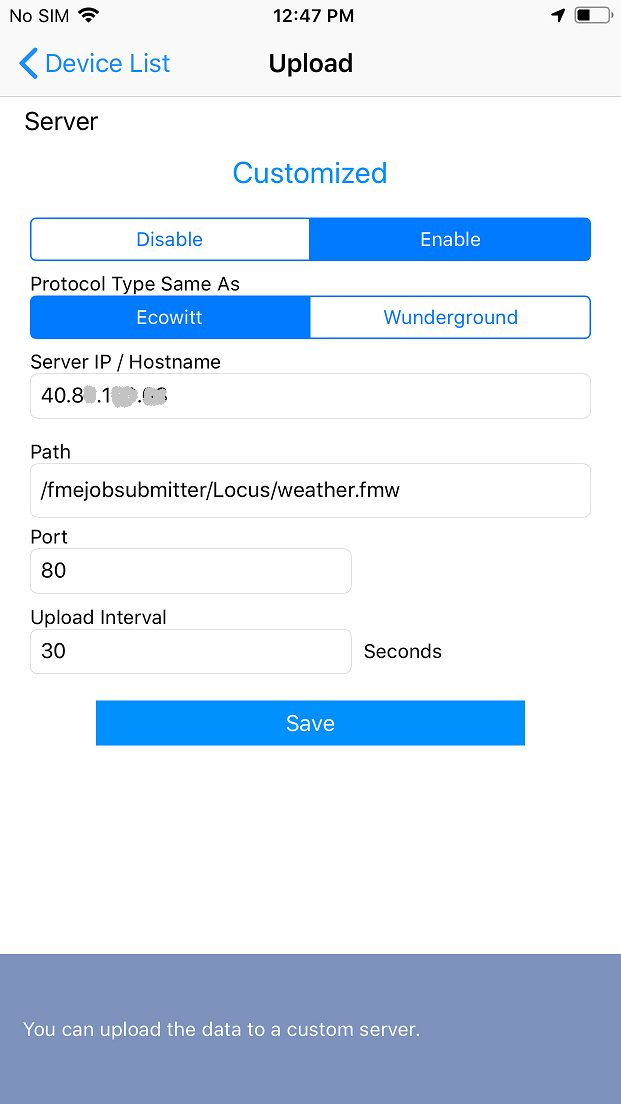
I had better results using the FME Flow’s IP address rather than its domain name.
Workspace to read in the data
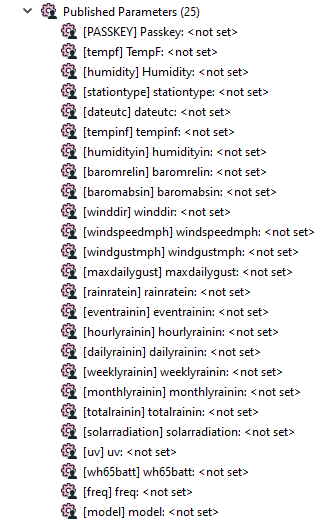
Using the Ecowitt protocol the station sends data as a POST request in the format:
Content-Type: application/x-www-form-urlencoded
Content-Length: 444
PASSKEY=688C36C7D9F123456789012345613DB6&stationtype=EasyWeatherV1.5.7&dateutc=2021-03-02+08:00:51&tempinf=72.3&humidityin=45&baromrelin=29.897&baromabsin=29.761&tempf=68.7&humidity=83&winddir=267&windspeedmph=0.0&windgustmph=0.0&maxdailygust=5.8&rainratein=0.000&eventrainin=0.000&hourlyrainin=0.000&dailyrainin=0.000&weeklyrainin=0.000&monthlyrainin=0.000&totalrainin=0.000&solarradiation=0.00&uv=0&wh65batt=0&freq=433M&model=WS2900C_V2.01.12
Where:
To read this into a workspace we create published parameters for each of the values:
A ParameterFetcher can fetch the values into attributes for you to do whatever you want with. Maybe you want to send an alert of the temperature drops below freezing or tell your watering system not to water the garden if there has been rain today.
In the workspace in the project download all that is being done is to convert the values to metric and then save them to a PostgreSQL database and also formatted to JSON with a JSON Writer.
Running the workspace
Normally the workspace would be run from an FME Flow Automation using a WebHook as the trigger, however in this case the WS View app has a limit to the length that the path can be which is too short to contain a token. To get around this publish the workspace to a repository that the Guest user has been given permissions to run workspaces from. Ideally this should be in a repository by itself to enable permissions to be changed without affecting other workspaces.
Sending the data to a websocket
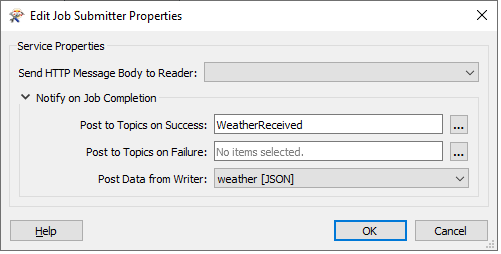
When publishing the workspace to FME Flow use the Notify on Job Completion section to post the output of the JSON writer to a WeatherReceived topic.
At this stage you can monitor the WeatherReceived topic to make sure the readings are coming in every 30 seconds.
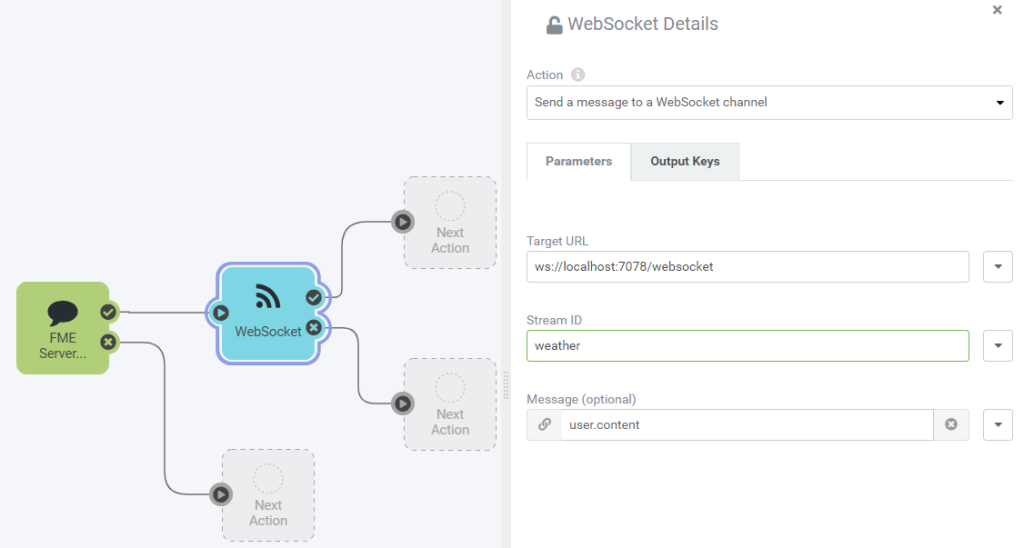
The next step in creating a websocket to output this data is to head to the Automations part of FME Flow and create a new Automation. This is a two-step automation where the Trigger is “FME Flow Topic notified” listening for the WeatherReceived topic. Under Output Keys, a user key is created called content and set to {subscriber_content}.

The External Action is “Send a message to a WebSocket channel” with the target URL of ws://localhost:7078/websocket, the stream ID of weather and the content set to user.content
After starting the Automation a simple workspace in FME Form with a WebSocketReceiver can listen on the web socket to ensure it is sending data out. The connection preamble to listen to the weather stream is:
{
“ws_op”: “open”,
“ws_stream_ids”: [“weather”]
}
Displaying the readings on a web page
The final stage is to display the readings on a web page with live updates. To do this we will make use of the FME Flow Javascript Library:
After including the library in the web page with
<script type=”text/javascript” src=”https://api.fmeserver.com/js/v3/FMEServer.js”> </script>
it connects to FME Flow with
window.onload = function() {
msg_div = document.getElementById( “messages” );
FMEServer.init({ server : “http://fmeserver.[mysite].com”, token : “bf732ddf03d2ff91072100112945cf6118990” });
startWebSocket();
};
Where the token is generated in the Token Management section of the FME Flow UI. No permissions are needed to be assigned to the token to be able to read the web socket.
The function that connects to the web socket and displays the incoming readings is
function startWebSocket() {
if( “WebSocket” in window ) {
msg_div.innerHTML += “<p>WebSockets are supported by your browser.</p>”;
// Open the WebSocket connection for send and response to FME Flow
ws = FMEServer.getWebSocketConnection( “weather”, createCloseBtn );
// Response socket event for server response
ws.onmessage = function( evt ) {
var obj = JSON.parse(evt.data);
msg_div.innerHTML += “<p>Message is received -> “+new Date().toLocaleTimeString()+” : “+evt.data+”</p>”;
setCurrentTime(obj[0].dateutc);
settemperature(obj[0].tempc);
sethumidity(obj[0].humidity);
settemperaturein(obj[0].tempinc);
sethumidityin(obj[0].humidityin);
setdailyrain(obj[0].dailyrainmm);
};
// Send socket event for connection closed
ws.onclose = function() {
// WebSocket is closed.
msg_div.innerHTML += “<p>Connection is now closed.</p>”;
};
} else {
// The browser doesn’t support WebSocket
msg_div.innerHTML += “<p>WebSockets are NOT supported by your browser.</p>”;
}
}
The websocket messages are turned into a JSON object with
var obj = JSON.parse(evt.data);
and the various readings accessed by obj[0].tempc, obj[0].humidityin etc.
To display the readings, I have used a 7 Segment Display CSS example from https://codepen.io/0x04/pen/KdBuA
This will not go into how this works but feel free to look at the code in the download or at the live page at http://imappingfmevm.lbs.co.nz/weather/index.html.
The resulting page looks like this and updates every 30 seconds.

Do It Yourself
This file available for download
http://imappingfmevm.lbs.co.nz/weather/WeatherStationDemo1.0.0_2021-3-31-T172025_b20820.fsproject
is an FME Flow Project archive that contains:
If you don’t have a weather station of your own, you can access the data from Locus’s station by connecting to this websocket in an FME workspace:
ws://imappingfmevm.lbs.co.nz:7078/websocket
With the connection preamble shown above. If you use the websocket stream to build anything please do let us know about it!